EN
Magnetic Lash Box: Printed Carton + 3D Printed Case — The 2026 OEM Guide
Most packaging briefs contain one question: which box? This one contains three, because the pack is built with three different processes.
The outer carton is printed — a pink matte folding box with the instructions on the back panel. The round case and the applicator tool are 3D printed — one-piece geometries with internal wells and a contoured grip that would each need their own steel tool to mould. And a printed instruction card does the teaching that neither box can do alone.
That mix is not a compromise. It is a deliberate answer to a real problem: how to launch a magnetic lash product with custom internal geometry, at a volume that cannot justify tooling.
This guide covers what each process is doing, where the boundaries are between them, and the decision that catches most brands out — when to stop 3D printing and mould instead.
👉Request a free sample of the magnetic lash box
Quick answer
One pack, three manufacturing processes, and one rule for choosing between them:
| Component | Process | Why this process |
|---|---|---|
| Round case | 3D printing | Internal wells and a living hinge in one part; no tooling to justify at sample and low volume |
| Applicator tool | 3D printing | Contoured geometry and an ergonomic grip that is expensive to tool and cheap to print |
| Outer carton | Printing | Photographic instructions, brand colour and low unit cost at volume |
| Instruction card | Printing | The detail the box has no room for |
The rule: print what is flat and needs brand colour, print in 3D what is shaped and needs to be held. Then move the shaped parts to injection moulding when volume makes the tool pay for itself.
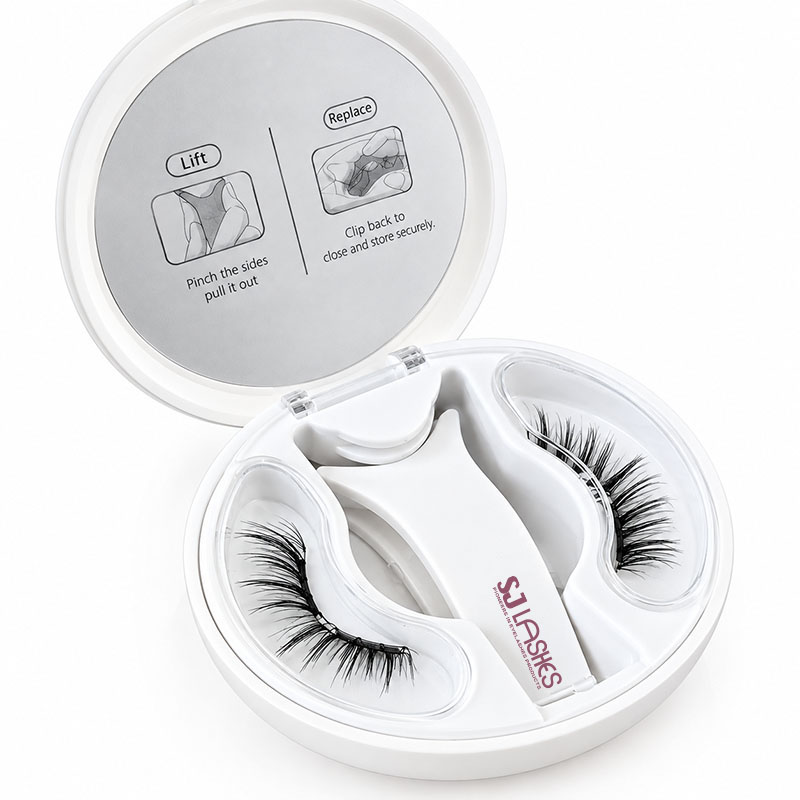
Image title: A Case That Teaches You How to Swap the Tray
What the pack actually is
Four objects, and each one has a job the others cannot do.
The round case. A white clamshell compact, hinged at the back, holding two magnetic lash strips in moulded wells with a centre channel for the applicator. It is the part the customer keeps after the lashes are gone, which is why it deserves the 3D printed geometry rather than a flat card.
The applicator. A Y-shaped tool that holds the lash strip and places it against the natural lash line. The grip is contoured, the fork is shaped to the lash band, and the whole part is one piece.
The outer carton. A pale pink matte folding box carrying the product name, the vertical brand mark, and a four-step instruction block on the back panel, with the die-cut structure visible in the dieline.
The instruction card. A six-step card with a photograph per step, sized to sit inside the case.
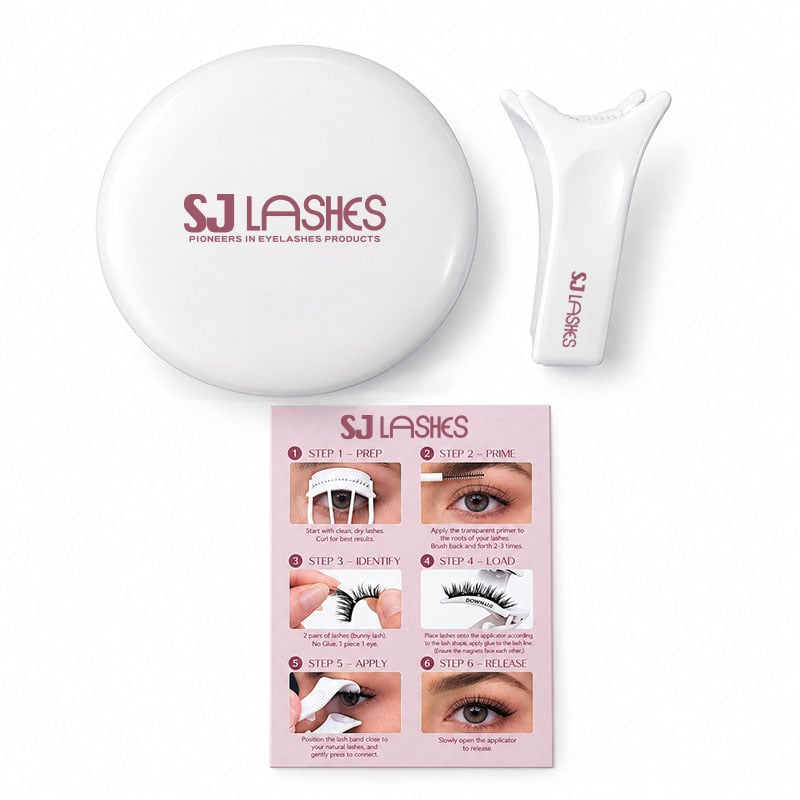
Image title: Four Objects, Three Processes, One Pack
The round case, and why it is 3D printed
Look at what the case has to do. It has to hold two lash strips at a fixed curvature without crushing the fibres, hold a tool in the middle without it rattling, close on a hinge that survives repeated opening, and present a lid interior that carries instructions.
Injection moulding can do all of that — at volume, with a steel tool per part. At sample and first-run quantities, it cannot, because the tool has to be paid for before the first unit exists.
3D printing inverts the economics. There is no tool. The internal wells, the centre channel, the hinge and the lid recess are all generated from the file, so a change to the well shape costs a new file rather than a new mould.
There is a second benefit that matters more than cost at this stage: you can hold the geometry in your hand before committing to it. Whether the tool rattles, whether the wells hold the strip at the right curvature, whether the hinge feels right — those are questions you answer with a physical part, not a drawing. A 3D printed sample answers them in days.
And a third: the case body takes client branding directly. The same case and tool are shown here branded for one client, which is the practical version of the private-label promise — the geometry is shared, the brand is applied.
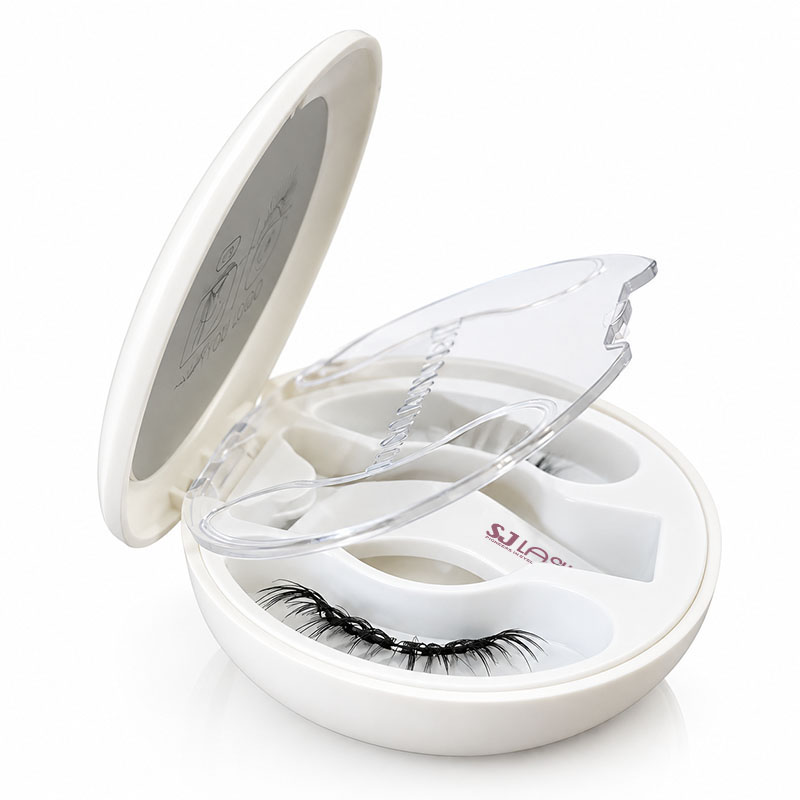
Image title: Hinge, Wells and Channel — All Generated From One File
The applicator: geometry that is cheap to print and expensive to tool
The applicator is the clearest case for 3D printing in the whole pack.
It is a Y-shaped part with a tapered fork that follows the lash band, a contoured waist and a grip that has to sit in a hand at an angle. It also has to be light enough not to pull the lash strip out of position while the customer is placing it.
Shaped like that, it is a difficult tooling project and an easy print. That asymmetry — hard to mould, easy to print — is the signal to print it. The reverse is also true: a flat rectangular card tray is easy to mould and pointless to print.
The applicator also carries the brand, printed directly onto the grip, which is what turns a generic tool into a branded one.
The printed carton: what print does that 3D printing cannot
The outer carton is where the brand lives, and it is printed for three reasons 3D printing cannot match.
Photographic instructions. The back panel carries a four-step block with photographs — prep, prime, identify, load — that shows rather than tells. Photographic print is what a carton does well; a 3D printed surface cannot reproduce it.
Brand colour at scale. The pale pink and the plum vertical wordmark come from a Pantone reference, so the colour is identical across every reprint. Matching a specific brand colour across a 3D printed part is a different and less controllable problem.
Unit cost at volume. A folding carton on coated art paper is one of the cheapest ways to carry brand and instruction. Print the carton because print is cheap at volume; print the case in 3D because print cannot make a well.
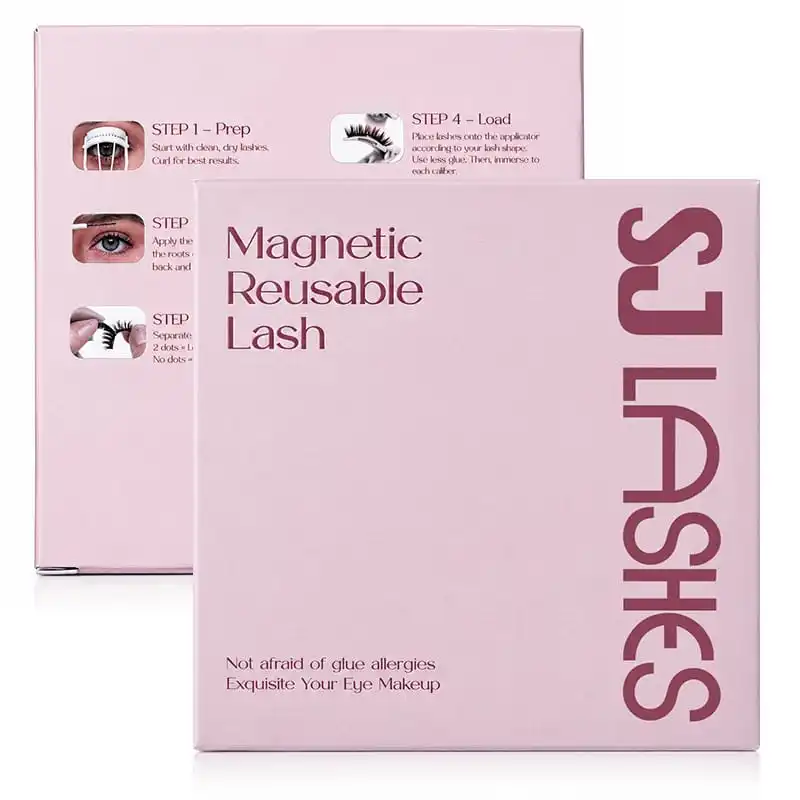
Image title: Photographs, Brand Colour and Volume Economics — Print's Three Advantages
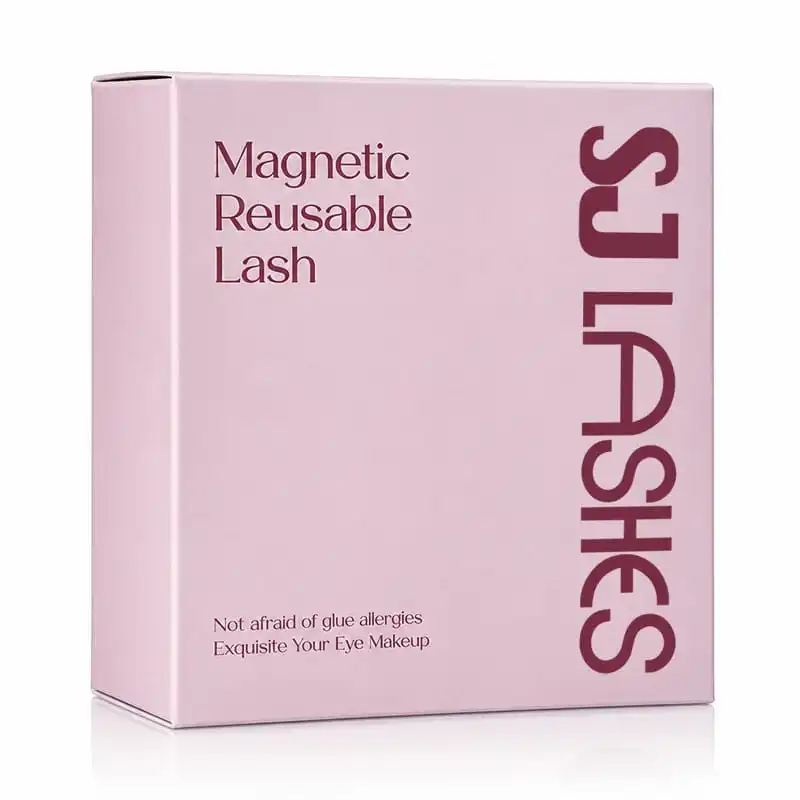
Image title: Brand Colour Held From a Pantone Reference, Reprint After Reprint
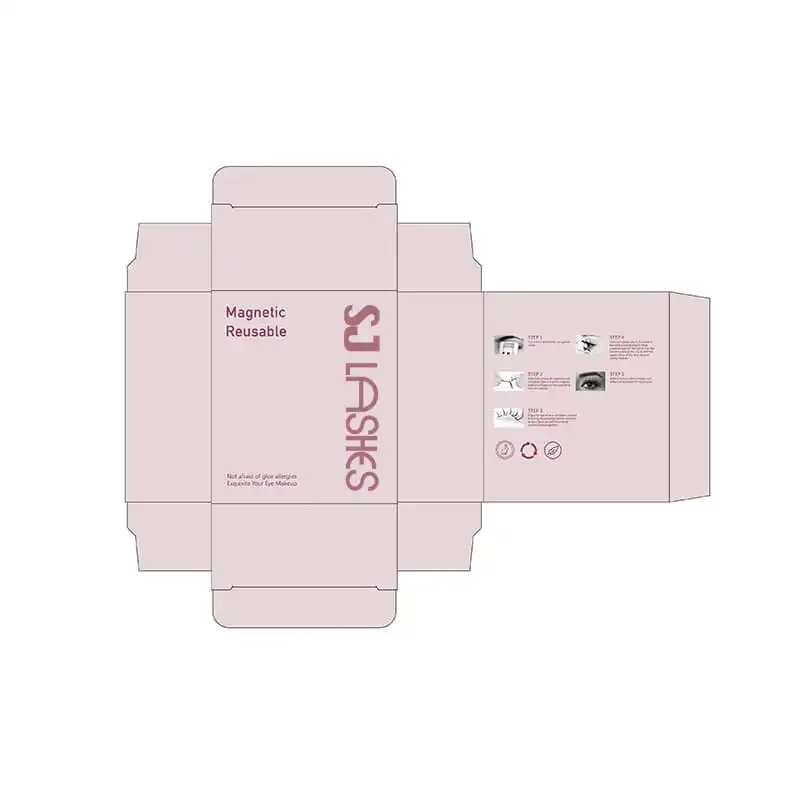
Image title: The Dieline — Flat Panels, Tuck Flaps, No Tooling
The instruction card: two levels of instruction, and one problem worth fixing
The pack carries instructions in two places, at two levels of detail. That is a good structure, and it is worth understanding before it goes wrong.
The carton carries four steps — prep, prime, identify, load — as a quick orientation with photographs.
The card carries six:
- Step 1 — Prep. Start with clean, dry lashes. Curl for best results.
- Step 2 — Prime. Apply the transparent primer to the roots of your lashes. Brush back and forth 2–3 times.
- Step 3 — Identify. 2 pairs of lashes. No glue. 1 piece, 1 eye.
- Step 4 — Load. Place lashes onto the applicator according to the lash shape. Apply the primer to the lash line. (Ensure the magnets face each other.)
- Step 5 — Apply. Position the lash band close to your natural lashes, and gently press to connect.
- Step 6 — Release. Slowly open the applicator to release.
The six-step structure is genuinely good, and steps 4 to 6 are the reason it works: a magnetic lash is not applied, it is loaded onto a tool, pressed, and then released. That release step is what separates a magnetic system from a strip lash, and it is exactly the step that a customer would skip if you did not print it.
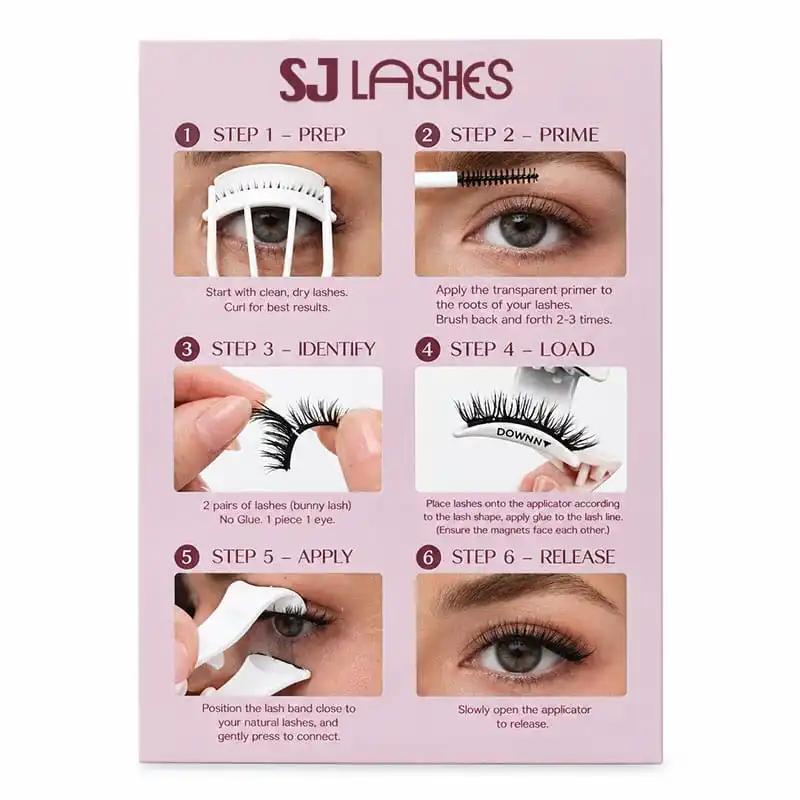
Image title: Six Steps — and the Release Step Is the One That Matters
The problem: three words for the same step
Now read steps 2, 3 and 4 together, and read them the way a first-time customer would.
Step 2 tells her to apply a transparent primer. Step 3 reassures her there is no glue. Step 4 tells her to apply the primer to the lash line. And the carton's own version of step 4 says to use less glue.
Three terms — primer, glue, no glue — are being used across one card and one box for a single system. That inconsistency is worth fixing, and it is the single most valuable change we would suggest on this product.
It matters for two reasons.
Commercially, it costs confidence. A customer who reads "No Glue" and then reads "apply glue to the lash line" stops trusting the instructions. She is now unsure whether she has bought a glue-free product or a product that needs careful gluing — and the answer is genuinely unclear on the card as printed. If the system uses a primer rather than an adhesive, the word glue should not appear anywhere on the pack, including in a reassurance.
For compliance, an inconsistent claim is a liability. "No glue" is a claim. If the same card instructs the customer to apply glue, the claim is contradicted by your own packaging. In markets that require substantiation for product claims, that is a problem you have printed rather than argued.
The fix is small. Decide the vocabulary — for example: primer for the liquid, no adhesive for the reassurance, and drop the word glue entirely. Then apply that one vocabulary consistently across the carton, the card and the lid interior. It costs a vocabulary decision, not a redesign.
The two missing steps on the carton
There is a second, smaller alignment question. The carton shows four steps; the card shows six. The two that the carton leaves out are Apply and Release — which are precisely the two steps that make the system magnetic.
A customer who reads only the carton reaches the end of step 4 and believes she is finished. Numbering the carton block as steps 1–4 of 6, or adding a single line pointing to the card, closes the gap without adding a panel.
The case that teaches itself
The best single idea in this pack is on the inside of the lid.
Printed across the lid interior, directly where the customer is looking when she opens the case, are two labelled diagrams: Lift — "pinch the sides, pull it out" — and Replace — "clip back to close and store securely."
This is the tray-swap instruction. It is the one operation a magnetic lash customer will need repeatedly, it is not obvious how to do, and on most products it would live on a leaflet that gets thrown away with the outer carton.
Putting it on the lid interior does three things at once. It is found at the exact moment it is needed, because you only see it when the case is open. It is impossible to lose, because it is part of the case. And it reduces support contacts, because the most likely question a customer has — how do I get the tray out — is answered before she asks it.
If you take one idea from this guide into your own product, take this one: put the recurring instruction where the hand already goes. Not on the leaflet. On the object.
3D printing vs injection moulding: when to switch
This is the decision that catches brands out, and it is worth being blunt about it.
3D printing wins when:
- You are sampling, or in the first run, and tooling cannot be justified.
- The geometry will still change — a well depth, a hinge position, a grip angle.
- You want a physical part in hand in days rather than weeks.
- You are running genuine low volume, or several low-volume variants.
- You need per-client branding on a shared geometry.
Injection moulding wins when:
- Volume is high enough that the tool cost per unit falls below the print cost per unit.
- The design has stopped changing and is unlikely to change again.
- You need a specific surface finish, tolerance or material property that printing cannot hold.
- You need the lower unit cost for a price-competitive retail product.
The honest caveats on 3D printing, so you go in with your eyes open:
- Unit cost does not fall the way print does. Printed parts cost roughly what they cost; there is no volume curve comparable to a carton run.
- Surface finish is different. A printed surface has a texture and a build-line character that is not the same as a moulded surface. Some brands make this a feature; it should still be a decision, not a surprise.
- Material and colour matching is a different problem. Matching a brand Pantone across printed board is routine; matching it across a printed part is not.
- Not every geometry is printable at every size. Very fine walls and very small features have limits.
The crossover moment is when your annual volume makes the tool cost per unit cheaper than the print cost per unit, and your design has stopped moving. Before that, print. After that, mould — and keep the printed version as your sample and short-run tool.
Printed lashes for the record are a different conversation: quality magnetic lashes need consistent, fine fibre and a stable band, which is a manufacturing process, not a printing one. 3D printing applies to the case and the tool, not to the product inside.
Customization options
The 3D printed case
- Case size and the number of wells.
- Well depth and the curvature the strip is held at.
- Hinge type and lid recess.
- Case colour and brand marking.
The 3D printed applicator
- Fork width tuned to the lash band.
- Grip length and contour.
- Direct brand printing on the grip.
The printed carton and card
- Folding cartons on coated art paper from 250gsm to 350gsm, or rigid boxes from 1.5mm to 2.0mm.
- CMYK or Pantone spot for brand colour, hot foil in gold, silver or rose gold, spot UV, debossing and embossing, gloss or matte lamination.
- Instruction content and step count, photographs, numbering and language.
- Dieline structure — tuck-end, sleeve or lid-and-base.
Explore our all-in-one packaging, magnetic lashes and magnetic lash kit boxes ranges.
Supplier scorecard and sampling
What to ask
- Which parts will be 3D printed and which will be printed or moulded, and why?
- Can you supply a 3D printed case and tool at sample quantity, and how long does a geometry change take?
- What surface finish should we expect on the printed parts, and can you send a finished sample rather than a render?
- How will our brand colour be matched on the printed board, and how will it be matched on the printed case?
- Can the lid interior carry a printed instruction graphic, and at what legibility?
- At what volume would you recommend moving the case and tool to injection moulding?
- Can the vocabulary across carton, card and case be aligned from one master copy list?
What to check on the sample
- Load the system yourself. Open the case, lift the tray, load a strip on the applicator, press it and release. If any step is unclear, it will be unclear for every customer.
- Vocabulary audit. Read the carton, the card and the lid interior together. Circle every word used for the adhesion step. If you circle more than one, fix the copy.
- Curve retention. Load a strip, close the case, and check after a week that the band has not been flattened by the well.
- Rattle test. Shake the closed case. The tool should not move.
- Hinge cycle. Open and close the case repeatedly. A printed hinge has a life; find out what yours is.
- Brand mark integrity. Check the marking on the case and the grip after handling with damp fingers.
- Step count. Confirm the carton and the card agree on how many steps there are.
Channel notes
Marketplace and DTC. The instruction card and the case are the two most photographed items. The lid interior graphic in particular reads well as a detail shot, and it is the sort of image that answers a buyer's question before they ask it in the reviews.
Beauty retail. A round reusable case presents far better on a shelf than a flat cardboard sleeve, and the "reusable" positioning justifies a higher price point than a disposable lash pack.
Salon and professional resale. The case is the part that survives. If the customer keeps it, treat the lash strips as the refill and price and pack them accordingly.
Gifting. The compact format reads as a gift object, which suits seasonal bundling better than a flat box.
Refill strategy. Because the case and tool are the durable parts, the natural commercial model is case plus replaceable lash strips. Design the refill packaging at the same time as the case, not afterwards.
OEM workflow
- Fix the process map — decide which parts are printed, which are 3D printed and which are moulded, and write down why.
- Print the shaped parts first and hold them. Geometry decisions made on paper are guesses.
- Write the copy once, centrally — one vocabulary list for the liquid, the reassurance and the steps, used on every surface.
- Set the step structure — how many steps, on which surface, and whether the counts agree.
- Place the recurring instruction on the object — the lid interior, not the leaflet.
- Test the system as a customer — load, press, release, lift, replace.
- Set the tooling trigger — write down the volume at which you will move to injection moulding.
- Produce and archive — 3D files, dieline, colour references and copy list in one place.
Quote request checklist
- Target market and channel.
- Which components are 3D printed and which are printed or moulded.
- Case size, well count, well depth and hinge requirement.
- Applicator fork width and grip contour.
- Case and applicator colour, and brand marking method.
- Carton structure, board weight and finish.
- Instruction content, step count and language.
- Brand colour references as Pantone spot values.
- Whether the lid interior carries a printed graphic.
- Lash strip quantities and whether refills ship separately.
- Sample quantity, first order quantity, and delivery window.
👉Request a free sample of the magnetic lash box
Compliance and honest claims
- Check the reassurance copy on the carton. "Not afraid of glue allergies" is a claim about a medical condition. In most markets a cosmetic product cannot promise freedom from allergy, and allergy risk is individual. Wording along the lines of "no lash glue required" describes the system rather than promising a health outcome — check the final wording with your compliance adviser.
- Make the claim consistent with the instructions. A "no glue" line on the same card that tells the customer to apply glue is a contradiction in your own packaging. Align the vocabulary before printing.
- Substantiate "reusable". If the pack says reusable, be able to state how many uses and under what care, and make the care instructions match.
- Put patch testing and stop-use guidance on the card. Magnetic systems still involve a liquid primer applied at the lash line, and customers need the standard precaution wording.
- Label the liquid. A primer is a cosmetic product in most markets, with ingredient declaration, batch coding and market-specific language requirements.
- Keep ingredients current. If the primer formulation changes, the card and any label change with it.
- Treat the instruction card as regulated labelling where it carries ingredient or warning information, not as a decorative insert.
Requirements differ between markets. Confirm the final content and claims for your target market with your compliance adviser before the print run.
Why SJ LASHES
- Three processes under one roof — printed cartons, 3D printed cases and tools, and printed instruction cards, which is what makes a single coherent vocabulary possible.
- 3D printing for geometry that tooling cannot justify, with fast iteration so a well depth or grip angle can be changed and held in the hand.
- Hands-on sample work — you receive a finished case, not a render, so the hinge and the well geometry can be judged before committing.
- Brand marking on printed parts as well as on board, so the case and the tool carry the brand the way the carton does.
- Print and finish range — CMYK and Pantone spot, foil, spot UV, embossing and debossing, gloss and matte lamination.
- Magnetic lash experience across the product, the tool and the case as one system.
- Low MOQ with fast sampling, plus a clear view of the volume at which moulding becomes the better answer.
See our all-in-one packaging, magnetic lashes, cluster lash kit boxes and photography and video services pages.
FAQ
Why is the round case 3D printed rather than injection moulded?
Because at sample and first-run volume the tool cost cannot be justified. The case has internal wells, a centre channel and a hinge, and each of those would need its own mould. 3D printing generates all of it from a file, so a change costs a new file rather than a new tool.
When should we switch from 3D printing to injection moulding?
When your annual volume makes the tool cost per unit cheaper than the print cost per unit, and your design has stopped changing. Before that point, print. After it, mould — and keep the printed version as your sample and short-run tool.
Does 3D printing cost less than moulding?
Per unit, no. 3D printing wins on tooling cost and on change cost, not on unit cost. A printed part costs roughly what it costs; there is no volume curve comparable to a carton run. It is the right answer at low volume and the wrong answer at high volume.
Are the lashes themselves 3D printed?
No. 3D printing applies to the case and the applicator tool. Magnetic lashes need consistent fine fibre and a stable band, which is a manufacturing process rather than a printing one.
What is the most useful instruction to put on the case itself?
How to lift the tray out and clip it back. We print it on the inside of the lid, because that is where the customer is looking when the case is open. It is the instruction she will need repeatedly, and it cannot be lost because it is part of the case.
How many instruction steps should the pack carry?
As many as the process needs, and the same number everywhere. The card in this pack carries six steps because a magnetic lash is loaded, pressed and released rather than simply applied. If the carton shows fewer, number it as a subset of the card so the customer does not stop early.
Can a printed carton and a 3D printed case share one brand colour?
Yes, but they are matched differently and they will not be identical by default. Board colour is matched from a Pantone reference across reprints. Matching the same colour on a printed part is a different and less predictable process, so treat the two colour specs as separate jobs.
What is the minimum order for a custom magnetic lash box?
It depends on how many components are 3D printed and how much of the carton and card is custom. Share your component list and target quantities and we will confirm what is achievable for a first run.
Final thought
This pack works because it stops asking which single process can do everything.
Print does flat brand and photography. 3D printing does geometry that must be held. A card does the detail the box has no room for. The mistake is not mixing processes — it is mixing them without a reason, or printing the same claim in three different words.
Decide the process per component. Decide the vocabulary once. Then put the instruction that gets repeated on the object the customer keeps.
👉Request a free sample and quote from SJ LASHES
For more packaging development, factory footage and application education, follow SJ LASHES on Instagram and read the SJ LASHES blog.